Mounting Unformatted Drive in Ubuntu
Here, we will be mounting a new drive in Ubuntu. The beginning items will be for adding a partition, and then formatting it to an EXT4 filesystem.
Personally, the reason I needed this was that I had created a 2nd VirtualDisk in my VirtualBox Host, and needed to figure out how to format it and then mount it to my Ubuntu 16.04 Guest.
Install/Create the Drive
I’m not going to really detail this part, because if you purchased a new, internal drive - or even an external, USB drive - it either came with directions or you know how to install that.
As for the VirtualDisk for your VM of choice, that usually is fairly easy. At least with VirtualBox it is.
Finding the Drive
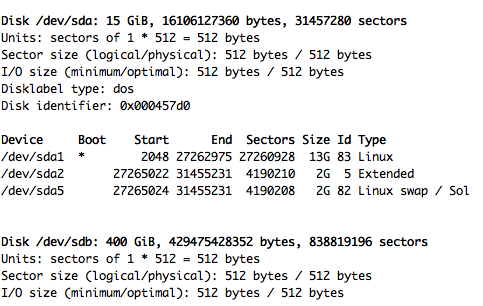
So, obviously, we need to find the system-assigned ID for the drive, as this is the info we use for formatting, mounting, etc.
So, we will be using fdisk for these next few steps:
sudo fdisk -l
Note
In my Ubuntu instance inside of VirtualBox, not only did it show my Drives, but /dev/ram drives as well. I’m assuming this is just one form of memory and disk I/O management VirtualBox uses.
So, my 2nd hard drive is labeled as /dev/sdb, and because I had just created the virtual drive on my host machine, there are no partitions.
Create Partitions
Now we want to create the partitions for the drive. For me, since I only wanted one large partition, this is easy with fdisk. If you’re wanting/needing a more complicated setup, it might be best to lookup parted and gparted (graphical version of parted) for better partitioning.
So, now, we want to run
sudo fdisk /dev/sdb
Or, if you’re drive’s name is different, replace the /dev/sdb with whatever yours is.
You now will be dropped into the fdisk shell prompt. To start the creation of a new partition, press n and enter to start.
Next, since we’re doing one, whole-drive partition, select p for primary partition. Then, you can just hit enter through Partition Number, First sector and Last sector as those have defaults pre-filled for you, if you would rather use those.
This creates, in memory - WITHOUT formally writing to the disk - a partition for the drive. You have to hit w in order to formally write the information onto the disk. But, before you do that, I suggest now using option p for print the partition table so you can confirm the information before fatally committing to it.
Write Partitions
Now, once you KNOW for SURE you’re ready, use the w option to write to disk. And then, depending on your version of fdisk, it’ll either drop you back into the normal shell immeditely, or you’ll have to q - for quit - to quit out of fdisk.
Partprobe
Next, you want to run partprobe in order to tell the kernel, without restarting your machine, about the changes made to that harddrive.
sudo partprobe /dev/sdb
Or, whatever your devices name is.
Format
Now, we need to format our drive so the filesystem is readable/writable and what nots.
sudo mkfs /dev/sdb1 -t ext4
So, that is mkfs or makefilesystem, then our drive with the partition number. The -t flag is for type of filesystem, and ext4 for, well, ext4 filesystem.
If you are wanting/needing a different system, please consult those specific formatting directions.
Mount Point
Now, you need to create a directory that you want this disk mounted to, as that is how you are able to access this drive.
I personally tend to mount all my drives inside of /media. No real reason for it. Just started that way and became habit. You can mount this drive anywhere you want. But, beside /media, there is also the /mnt directory, which is much more of a literal “duh, stick it here” kind of naming that linux loves.
So, make the directory, adjust the ownership info, then mount the ext4 filesystem drive:
sudo mkdir /media/<name of folder>
sudo chmod -R 777 /media/<name of folder>
sudo mount /dev/sdb1 /media/<name of folder> -t ext4
So, lets break that down:
chmod- changing the ownership levels to the mode0777which translates to: anyone can do anything with this.mount- obviously the mount program
The first option has to be the device with partition number you want to mount
The second option being the directory to mount ONTO
-t ext4being “type ext4”
After Mount
Now, if you didn’t receive any error messages, you can basically, with 99% confidence, say its mounted. But, doesn’t hurt to cd into it and create a blank file real quick to test the read/write.
cd /media/<name of folder>
touch ./test.txt
ls -lah
sudo rm ./test.txt
So, if those all worked, its mounted and you can read/write to it.
Permanent Mounting
The best way to be able to mount your drives using /etc/fdisk is by referencing the drive’s UUID number. How do you check that?
sudo blkid
it will give you a line for every drive and partition that it can find. You can use either the UUID or the PARTUUID in your fstab file.
PARTUUID=86e32033-01  /boot           vfat    defaults          0       2
PARTUUID=86e32033-02  /               ext4    defaults,noatime  0       1