LVM How To
Old or Outdated
This file is old, and I have yet to proof read it since I last wrote it, which was like, a million years ago or something, so one: take it with a grain of salt; and two: I’m sorry if its wrong! Please, feel free to open an issue on the corresponding github page: Issues · jpartain89/Software-Install-Guides · GitHub
This how to, for now - like all the others - is more for my remembering how to do something, and as I learn more about LVM, I’ll try to add those nuggets here.
Old Hard Drive?
Do you have an old drive that you need to erase and reformat? There are several ways to erase a disk on debian-based systems, but we’ll use good old fdisk for this one.
Like above, you wanna run sudo lsblk or sudo fdisk -l to find where your drive is located. Then, use that designation for the next commands:
sudo fdisk /dev/<drive_label>
Next, you’ll want to use d to delete all of the partitions, using the command for as many partitions are on the drive.
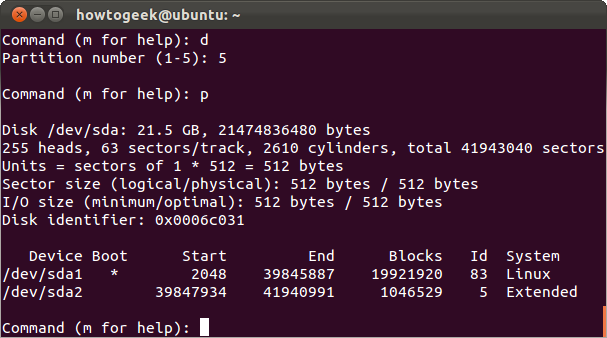
Then, you can use the p command to print the current table.
Cleaned Hard Drive
These steps are for a fresh hard drive, either brand new or freshly erased, and we’ll be using fdisk once again.
sudo fdisk -l
This command lists the hard drives that the OS can find, whether actually mounted or not. And, it outputs a LOT of information. An alternative Command you can use, that I usually prefer:
sudo lsblk
This one is really great for if you already have drives mounted somewhere, so you can keep your bearings on which drives are what. Example output below:
NAME                MAJ:MIN RM   SIZE RO TYPE MOUNTPOINT
sda                   8:0    0   1.8T  0 disk
└─sda1                8:1    0   1.8T  0 part /media/server1
sdb                   8:16   0   1.8T  0 disk
└─sdb1                8:17   0   1.8T  0 part /media/server2
sdc                   8:32   0 465.8G  0 disk
├─sdc1                8:33   0   456G  0 part /
└─sdc2                8:34   0   9.8G  0 part [SWAP]
sr0                  11:0    1  1024M  0 rom
Next, you’ll use the ID of the drive in the command:
sudo fdisk /dev/<disk name>
This starts fdisk with your disk selected. If you want to see all of the commands, m is the help option.
We are wanting to add a new partition, so type n and press enter, and then select p for primary. Next, it’ll ask for the sector locations of where you want the partitions to exist. You’ll notice that the program gives you a default selection to choose from. For the sector locations, you can choose the default options that fdisk provides, pressing enter to keep going.
Next, you’ll use the t option, which changes the partition type/id. In here, there is a super long list of options, and how you select the id can change from version to version, so you’ll need to list the options.
Command (m for help): t
Selected partition 1
Partition type (type L to list all types): l

0  Empty           24  NEC DOS         81  Minix / old Lin bf  Solaris
1  FAT12           27  Hidden NTFS Win 82  Linux swap / So c1  DRDOS/sec (FAT-
2  XENIX root      39  Plan 9          83  Linux           c4  DRDOS/sec (FAT-
3  XENIX usr       3c  PartitionMagic  84  OS/2 hidden or  c6  DRDOS/sec (FAT-
4  FAT16 <32M      40  Venix 80286     85  Linux extended  c7  Syrinx
5  Extended        41  PPC PReP Boot   86  NTFS volume set da  Non-FS data
6  FAT16           42  SFS             87  NTFS volume set db  CP/M / CTOS / .
7  HPFS/NTFS/exFAT 4d  QNX4.x          88  Linux plaintext de  Dell Utility
8  AIX             4e  QNX4.x 2nd part 8e  Linux LVM       df  BootIt
9  AIX bootable    4f  QNX4.x 3rd part 93  Amoeba          e1  DOS access
a  OS/2 Boot Manag 50  OnTrack DM      94  Amoeba BBT      e3  DOS R/O
b  W95 FAT32       51  OnTrack DM6 Aux 9f  BSD/OS          e4  SpeedStor
c  W95 FAT32 (LBA) 52  CP/M            a0  IBM Thinkpad hi ea  Rufus alignment
e  W95 FAT16 (LBA) 53  OnTrack DM6 Aux a5  FreeBSD         eb  BeOS fs
f  W95 Ext'd (LBA) 54  OnTrackDM6      a6  OpenBSD         ee  GPT
10  OPUS            55  EZ-Drive        a7  NeXTSTEP        ef  EFI (FAT-12/16/
11  Hidden FAT12    56  Golden Bow      a8  Darwin UFS      f0  Linux/PA-RISC b
12  Compaq diagnost 5c  Priam Edisk     a9  NetBSD          f1  SpeedStor
14  Hidden FAT16 <3 61  SpeedStor       ab  Darwin boot     f4  SpeedStor
16  Hidden FAT16    63  GNU HURD or Sys af  HFS / HFS+      f2  DOS secondary
17  Hidden HPFS/NTF 64  Novell Netware  b7  BSDI fs         fb  VMware VMFS
18  AST SmartSleep  65  Novell Netware  b8  BSDI swap       fc  VMware VMKCORE
1b  Hidden W95 FAT3 70  DiskSecure Mult bb  Boot Wizard hid fd  Linux raid auto
1c  Hidden W95 FAT3 75  PC/IX           bc  Acronis FAT32 L fe  LANstep
1e  Hidden W95 FAT1 80  Old Minix       be  Solaris boot    ff  BBT
Partition type (type L to list all types):
The id you’re wanting to pick from here is Linux LVM, which with the above options is 8e.
And, finally, use w to write all of these changes to the drive, and then fdisk exits you out.
LVM Commands
Now, we start using the actual commands for LVM.
LVM Physical Volume
First, before we make the Volume Group, we need to finish working on the freshly wiped hard drive You’ll need to run pvcreate to finish that off.
sudo pvcreate /dev/<disk name>
It’ll most likely throw a warning saying that an existing ext4 signature was detected. Are you sure you want to continue? Enter y to confirm, and it formally formats it correctly for you to be able to use it in an LVM Volume Group.
Volume Group
We need to create the Volume Group first:
sudo vgcreate <pool_name> /dev/<disk_label>
Replace the <pool_name> with the name you want to use. I like to use the computer’s host name as the volume name, as I usually only have one volume on my systems.
Logical Volume
Next, we create the logical volume that LVM will use. This is the individual volumes within the group, like partitions on a hard drive.
sudo lvcreate -l 100%FREE -n <volume_name> <pool_name>
Lets break this down a bit:
-l : This option is for selecting the size of the volume. There are several different options not only within the -l flag, but there is also a -L flag for using a specific size, like
3Gfor 3 GBs. To get a handle on this info, its best to start looking at lvcreate s man page. The 100%FREE option here is telling the program to use all available free space.-n : this is for saving the volume’s name.
Then, you finish it off with the
<pool_name>from earlier.
Filesystem
And, finally, we have to format an actual file system inside the volume.
sudo mkfs -t <filesystem> /dev/<pool_name>/<volume_name>
Here, the location of the Volume Group and Logical Volume are within the /dev directory. But, the first time you run this command, the normal bash-completion might not yet have this location ready for you, so you’ll need to type out the entire location.
Mount Point
Now, create the mount point and mount the volume!
sudo mkdir <your_mount_point>
sudo mount /dev/<pool_name>/<volume_name> <your_mount_point>
So, from now on, you are able to reference just the volume_name for however many hard drives you place within your volume.