DDRescue
Note
These directions are way out of date. Do not use these! I have since switched to a different process or tool since writing this particular article, but keeping it up for posterities sake, until I can properly replace it.
What have I changed to you ask? Anything building I’ve tried switching over to Ansible to handle in a much more programatic way. Others might be tools that I just don’t use at all anymore, due to changing DNS hosts.

A nice, command line output of its copying progress…. Not to mention ddrescue tends to be a more granular means of copying files over.
Plus, sans SD Card? Its a good backup tool to have for, well, backing up filesystems on a more granular, hardware-is-prone-to-fail type of level. Also allowing multiple passes over said data, so that if the sector pooped out the first time, maybe a 2nd or 3rd pass would, maybe not help but increase the odds of that one sector copying.
Its original intent, as you might can gather from its name, is to go over a potentially failing or failed hard drive, sector by sector, to try to pull ANY info whatsoever from that drive. Thus, the options for “retry passes,” “max-errors” and the like.
Installing
So, if you’re using macOS? I would assume/hope you have ‘HomeBrew <brew.sh>’_ installed. If so, do:
brew install ddrescue
On Linux, the specific, newer and updated tool is called GDDRescue, since its a part of the GNU Library of Tools.
So, to install on debian-based linux:
sudo apt-get install gddrescue
How is it Used?
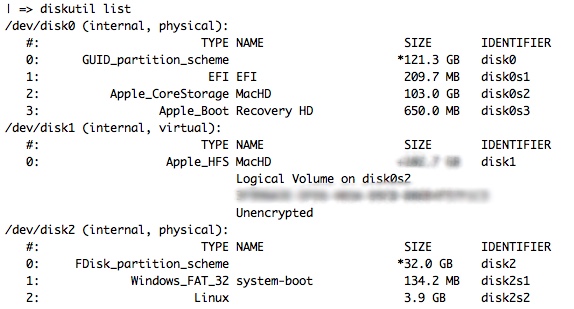
First, do your OS of choices means of discovering the location of the SD card you want to image:
macOS/OS X
diskutil list

Which gives you the list of all drives mounted or visible on OS X/macOS. Which, usually your SD Card is last.
Next, we want to unmount the drive - not eject - so we can write to the root of the SD card.
diskutil umountDisk /dev/disk##
Replacing ## with the disk drive number you found from before.
sudo ddrescue -f ~/.img/location/to/copy/to /dev/disk##
Break it Down
First, -f flag is for Force, telling ddrescue we REALLY want to image this source file onto this drive.
Second, the first file location. This is the source file, or what you want the SD card to look like. Or in the case of backing up a drive, the first location.
Then, the /dev/disk##. Make sure to replace ## with the drive number, again. This is the final place you want the info copied to. If you were doing the backup, like above, you could specify a specific file location, name and format to output the info into. Which is beyond this documents scope. man ddrescue, or ddrescue --help can get you in the right direction.
Next, sit back and relax as you can watch the timer count down, the length of time passed count up, and plenty of other info while dd users have to sit and wait and HOPE it works.